How to Set Up Force Feed Backon Beamngdrive
BeamNG.drive supports most steering wheels and controllers, as long as they are PC-compatible. Here's a list of some devices that have been tested: Controller Support .
BeamNG.drive comes pre-configured for several controllers - those will work as without further configuration, provided their drivers have been installed correctly.
- For the rest of devices, you will have to assign controls.
- In all cases, you might want to fine tune the controls to your preference.
This page will help you with those two cases.
If you are running into problems when setting up your device, take a look at the Common Problems and Solutions page too.
Installing drivers for Windows
Always install the latest drivers for your device. If you don't, some functions may work incorrectly, or not work at all.
If you are not sure how to install or update its drivers, check the manual that came with it, or contact its manufacturer for support.
Out of date drivers can cause:
- Some buttons not working
- Throttle and brake pedal conflicting with each other
- Force feedback working incorrectly
- Some buttons not working
- H-shifter not working
- Clutch pedal not detected
- Steering wheel doesn't work all the way to 900 degrees
- Etc.
Recommended driver configuration
Once the drivers are installed, it's best to check their settings.
The general guideline is to apply as few filters as possible, so that the simulator receives clear inputs, and can output forces as transparently as possible.
First, go to Windows Control Panel, and locate the USB/game controllers option: 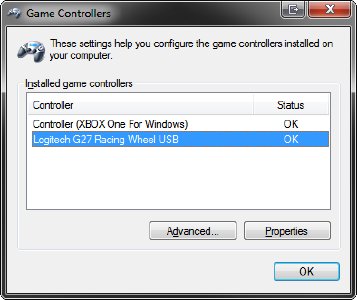
Double click your steering wheel to enter its Driver configuration panel.
From there you should find various settings for your device.
Some Drivers will choose different settings depending on which game you are running. The Drivers may call 'game profiles' or similar terms (if in doubt, check its manual).
Make sure you are modifying the appropriate profile!
Drivers: Input configuration
There's a few things you need to set up in the Drivers.
The location and name of these options will vary from one steering wheel to another. Check the device manual if in doubt.
- Configure the wheel for maximum wheel rotation range. In many wheels this is 900º, in others 1080º, etc. Use the maximum possible.
- Use independent throttle and brake pedals. This is often called "enable split pedals" (enable it), or "use combined axes" (disable it).
Drivers: Force feedback configuration
A few main settings to keep in mind:
- Make sure FFB is enabled.
- Try to disable any permanent centering spring effect. If not possible, set it to 0%.
- Try to disable any permanent damping effect. If not possible, set it to 0%.
BeamNG.drive uses the 'constant force' effect for all types of feedback. Even rumble strips, racetrack kerbs or road bumps are reproduced organically: their raw feeling comes straight from the physics engine, thanks to its high frequency of 2000 Hz.
The main thing you need to set up in the drivers is how much force you want to feel in your hands in a worst case scenario, such as a car crash:
- In many steering wheels, choosing 100% of force might be okay even during a car crash. Start with lower values if in doubt though.
- In powerful steering wheels, choosing 100% can be dangerous for your fingers and wrists. If, at your own risk, you choose 100% anyway, you will need to adopt the same safety measures you would in real life: letting go of the wheel before a crash occurs, always positioning your fingers outside the steering wheel rim, etc.
See in-game configuration for more info.
BeamNG.drive will use all the capabilities of your steering wheel. If, for example, you don't want to receive 20 newton-meter of force on your hands, then you need to configure your drivers to output a lower amount. We recommend starting at just 1 or 2 newton-meter).
Hardware check #1: Windows drivers
The steering wheel Driver configuration can normally display which buttons and axes are being pushed. Use each of the buttons and axes, one by one, and make sure they respond correctly on your screen.
Here you should check:
- Does the button or axis display respond every time you press?
- Does the button or axis display move all the way from zero to the maximum possible value?
- Does the button or axis display fluctuate or flicker a lot when you are not touching anything?
- Does the button or axis move only one of the items on your screen, or several?
If anything seems wrong, check your steering wheel manual, make sure its drivers are installed correctly (may require rebooting your computer), search the web for people suffering similar issues, or contact the manufacturer of the wheel to ask about your issue.
Hardware check #2: BeamNG.drive
Open BeamNG.Drive, Options > Controls > Hardware. Then use all the buttons and axes, make sure they respond correctly on screen too, just like with hardware check #1. 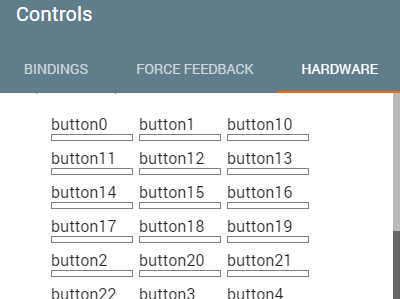
If anything is different in this menu than in the driver configuration panel, please check that Steam Big Picture is not interfering .
If that has failed too, contact us.
BeamNG.drive: Assigning Controls
You need to have installed the Drivers, otherwise it may be impossible to assign the controls correctly.
In the case of a few devices, BeamNG.drive already has a reasonable configuration by default. Those will only work if you have installed the Drivers.
Clicking 'Reset All' will revert back to the default bindings if they exist; otherwise it will remove any bindings you may have created.
Go to Options > Controls > Bindings > Vehicle. The bindings look someting like this: 
If no binding exists for your device, you will need to assign them using the '+' buttons on the right side.
The most important bindings are Throttle, Brake and Steering. You can also fully customize your H-shifter or sequential paddles, your parking brake, etc.
Steering binding
One of the most important bindings for your steering wheel is the 'Steering' binding, as you probably guessed.
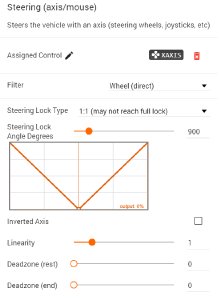
This is roughly what that binding might look like, but it will vary from one wheel to another:
-
Filter: choose 'Wheel (direct)' if you are using a steering wheel, as it provides instant responses without any additional input lag. If you are not using a steering wheel (e.g. gamepads, keyboards), this setting can trade responsiveness in exchange for smoothness.
-
Steering Lock Type:
- 1:N will map the max steering lock of your USB wheel, to the max lock of the car you're currently driving. The virtual wheel will only mimic your USB wheel if both happen to have the exact same steering lock.
- 1:1 will match the virtual wheel to your USB wheel. If your USB wheel cannot steer as much as the current car, then you'll lose maneouvering capabilities (such as when driving certain trucks)
- 1:1 hybrid will match the virtual wheel during the first half of your USB steering angle. And on the second half, it might start accelerating into 1:N for any vehicle where your USB wheel would run out of steering lock too soon (such as certain trucks). On the rest of cases it will continue matching the angles normally. This ensures you never lose any maneouvering capabilities.
-
Steering Lock Angle: this is only used when choosing '1:1' or '1:1 hybrid' Steering Lock Type. This should reflect how much angle your USB steering wheel can provide from its leftmost position, to its rightmost position. For many Logitech steering wheels, this will be 900 degrees.
Note: if you have configured your Drivers to a smaller steering lock, then you must use the same value in BeamNG.drive. For example, if you have configured your 900° steering wheel to operate with only 500°, then you should also set BeamNG.drive to 500°.
-
Inverted Axis: some devices output inverted values. Check the graph right above this setting, and move your wheel left and right. If the orange point in the graph is moving the wrong way, then you'll have to toggle this checkbox.
-
Linearity: choose 1 for most steering wheels. You may choose a different for gamepads, joysticks, and low-end steering wheels.
-
Deadzone (rest): choose 0 for steering wheels. You might need a bit of deadzone for some gamepads, joysticks, and pedals (frequent in devices that are old and worn out, but also in most new gamepads too).
-
Deadzone (end): choose 0 for steering wheels. You may need some deadzone if you're unable to reach the full travel of your pedal/joystick/gamepad.
BeamnNG.drive: Force feedback configuration
Basic set up
Go to the Options > Controls > Force Feedback > Available Hardware section. If BeamNG.drive has detected a force feedback-capable axis, it will be listed there.
In this menu, you will also see the steering wheel binding you created for 'steering' in the previous step: click the binding and scroll down to the Force Feedback Configuration section.

-
Enabled: tick this checkbox for force feedback to work
-
Inverted: in some steering wheels, the forces are inverted. Hop into a vehicle and, while parked, attempt to steer: you should feel some resistance. If, instead, your USB wheel attempts to steer all the way to full lock, you probably need to toggle this checkbox.
-
Strength: the appropriate value here will depend on how much torque your device is configure to produce. More powerful wheels need smaller values here, and less powerful wheels will need greater values. See Driver Configuration for more info.
-
Smoothing: it will remove details for a smoother experience, at the cost of greater lag. If you are noticing high frequency vibrations in your wheel, test progressively greater values. In BeamNG.drive it's impossible to fully get rid of all vibrations, so you need to find a balance between smoothness and lag versus the amount of detail you receive.
Advanced parameters
These are some minor tweaks for your These parameters allow advanced control over the force feedback:

-
Reduce strength at low speeds: if in doubt, leave this checkbox activated. It will reduce vibrations when the vehicle is parked or rolling very slowly. If you're into rock-crawling, you might prefer to leave this checkbox deactivated.
-
Side Accel Feedback: it attempts to communicate the lateral forces that your body would feel in real life, channeling them through the most common hardware we have: the steering wheel. This can lead to unexpected or confusing reactions of the steering wheel (such as unrealistic self-centering effects), so it's a matter of personal preference. Use with caution.
Update parameters
These parameters should be left alone 99.99% of the times. However, in some very rare cases, the update parameters might need to be adjusted:
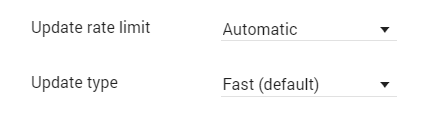
- Update rate limit: Limits how often the simulation will attempt to send new force feedback commands to the drivers. Most drivers/firmware/steering wheels cannot handle high update rates, and will behave incorrectly when asked to - often leading to much lower game framerates, and sometimes also to incorrect forces on the wheel. If set to "Automatic", BeamNG.drive will do its best to determine the highest safe frequency. This setting can be overriden if the "Automatic" detection is still providing too high update rates and needs lowering even more.
Recommended value: "Automatic"
- Update type: Allows to choose between two internal methods of sending the force feedback requests. One of them is optimized for speed ("Fast") and should be safe to use with almost any steering wheel. The other one, "Full", may be required for certain steering wheels before FFB can work correctly (or at all). This is the case of some direct drive wheels, for example.
Recommended value: "Fast (default)"
Neither of these two options should be touched if Force Feedback is working correctly already.
Basic configuration guide
Configuring the wheel can be difficult to get exactly right. Every driving style may need different force feedback settings, so here's a simplified method to get the basics right:
- Make sure the steering binding is fully linear (set its value to '1'), since non-linearity can get in the way of good forcefeedback.
- Disable all mods, as they can potentially influence or break how FFB works, at least while trying to get a working base line
- Choose an official vehicle, without mods, with default setup settings, and RWD drivetrain layout (such as the ETK K-series Kc6t (M)).
- Try to increase your framerate, preferably 60 FPS or more. To achieve that, you can lower the graphics settings. You will have to consider your priorities, as this is a compromise between visual quality and force feedback.
- Set the Smoothing to the largest value.
- Go for a drive with your usual driving style (racing, stunts, offroad, etc) and agressiveness.
- Tweak the "Strength" until the magnitude of forces you receive feels comfortable while driving (even if not detailed at this point).
- Ignore the forces while the vehicle is stationary or rolling slowly (we'll take care of that later).
- Check if forces during vehicle crashes are too great or too weak (be careful with your wrists and fingers!). If it feels too violent, decrease the strength configuration in Windows drivers (see the 'Windows drivers' section above, in this document), then come back here and try again.
- Now start with tweaking the "Smoothing": go for a drive, and gradually decrease the value until the wheel starts any quick rattling or vibration at driving speeds.
- When rattling starts to appear, dial back the "Smoothing" setting a bit.
- Now stop the car, and check if the wheel steers on its own from left to right and back again. If that's the case, enable the "Reduce strength at low speeds" checkbox.
This should give you a reasonable starting point for your settings. After that, feel free to play with different parameters to suit your personal preferences.
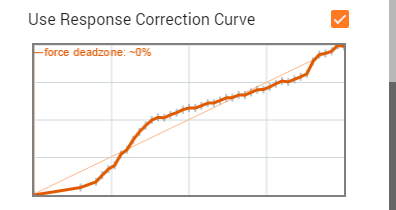
Response correction curves
This is an advanced option. Do not touch if you're not sure of what you are doing.
Introduction
Force feedback works by asking the steering wheel drivers to apply certain torque (certain rotational force) through the motors housed inside your steering wheel.
In an ideal world, the resulting torques would be proportional to the torques you initially requested.
However, in practice, this is rarely the case. Sometimes, when you ask 1 unit of torque, you may get 1.2 resulting units of torque. And then you ask for 2 units, but get only 1.9 units back. The result can vary wildly along the range of torques, and is impossible to know without testing each of all the possible torque values.
To compensate for this lack of linearity, we provide the option to use a Response Correction Curve. This curve basically tells BeamNG.drive how the steering wheel will respond to all possible requests. Based on that, BeamNG.drive will smartly "lie" to the drivers, requesting different torques, to get the actual desired resulting torque.
Reusability
Before continuing, one word about reusability of response curves:
The response curve will vary depending on the Windows drivers configuration.
For example, if you change the effects strength (or any other setting) in the Windows driver configuration panel, the response curve will most probably be different afterwards.
Keep that in mind if you are trying to use a response curve for your wheel while tweaking the Windows driver configuration.
Note: BeamNG.drive bundles response curves tailored to the recommended driver configuration (see the 2nd section of this guide). If you are not using the recommended configuration, the response curves may be off, and it is recommended to re-generate it for your specific drivers configuration. But even if you don't, the result will typically be better than disabling the curve altogether.
Also note that the response curve is usually the same for a given brand and model of steering wheel (unless it has undergone some serious hardware revision but still keeping the same model identifier). If you create a response curve for certain steering wheel model and drivers configuration, it will most probably be reusable by other owners of your steering wheel.
Generating your own response curve
Generating a response curve involves precise testing of your hardware, noting down what happens each time you apply certain torques.
There are several tools out there that allow to do it in an automated way, and register the resulting curve in a file, on disk.
BeamNG.drive is able to directly read the response curve files generated by the most popular 3rd party tools (such as WheelCheck and Force Curve Modifier), without needing any further format modifications. So just run those tools, export the result to a file, and place it at Documents/BeamNG.drive/settings/inputmaps/wheel.*.
Note: the numbers contained in LUT files have a different meaning than those contained in the rest of file types (even if they are all 'just' pairs of numbers). Please do not rename the ".lut" extension to something else, this way BeamNG.drive will know it needs to handle the LUT numbers differently than is usual.
For more information, please search the web for those 3rd party tool names, and follow any of the existing guides out there.
Note: Hover your mouse over the response curve graph of your BeamNG.drive FFB menu to get more detailed information about the naming conventions. Typically wheel.csv will do.
How the curve is used
BeamNG.drive internally sanitizes the curve you see on screen:
- The curve will be normalized, from 0 (no torque) to 1 (maximum torque supported by your steering wheel). You don't need to normalize any values yourself.
- It will remove any valleys, so that the response is always incremental
- It will assume you start at 0 response for 0 requested torque, and that you end at 100% response for 100% requested torque.
After this sanitization has taken place, the curve is used in this way:
- When the resulting torque is too small, BeamNG.drive will bump up the requested torque, so that it gets its desired resulting torque.
- When the resulting torque is too big, BeamNG.drive will request a bit smaller torques, so the result is not that huge.
Tweaking the curve
You will typically want to tweak the curve just a little bit before it is used by the game.
If you have already placed the wheel.csv file in your inputmaps directory, the game will read it each time you restart the game or press Ctrl+L to reload the input system.
When that happens, the curve is embedded into your inputmap file. If you modify the source wheel.csv file, and press Ctrl+L, the inputmap file will be updated again. Remove the source file when you are happy with it.
Measurement errors:
If you have only generated the response curve once, it is possible that you have some error in the readings. For example, if you accidentally touched the wheel while it rotated, or bumped into your desk, then that curve point may be incorrect.
Repeating the measurement several times, and comparing the resulting curves, allows you to notice any possible outlier values that may have happened.
Noise:
If you correctly measure the curve several times, you will notice slight variations. This can happen because of many circumstances, e.g. temperature changes, slight gear or belt positioning differences, etc.
Measuring the curve several times not only allows to detect errors (as described before) but are useful to remove this kind of noise. You can average all of the curves together, and use the resulting curve in BeamNG.drive. Note that there shouldn't be a huge difference from one run to the next (unless your wheel is damaged), so it's okay if you decide to skip this step :-)
Low torque vibration:
Most wheels cannot handle low torques correctly. The response curve will usually be very plain in the first section, and this will force BeamNG.drive to request huge torques to compensate. This usually creates unwanted vibrations.
To prevent this, make sure you add a slight initial slope to the curve, even if the response curve clearly showed a huge deadzone in that region. This will smooth out the jerky response for low torque situations.
Visualizing the improvements
To assist you with tweaking or verifying the response curve, you can visualize the results in real time, while driving.
- Go to the menu
Apps>Add app - Place the
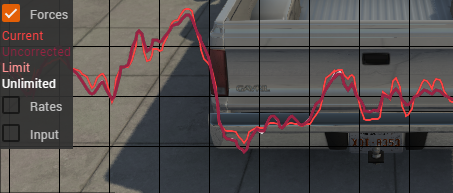
FFB Graphsomewhere on the screen and clickDone.
The data you are looking for here is:
- Current: shows what torque is being actually requested to the Windows drivers. This is usually not the torque we want, but remember we have to lie to the drivers in order to get the torque we want.
- Uncorrected: shows what is the expected resulting torque after having travelled through the drivers, firmware and hardware. In other words, the actually desired torque.
- Limit: is just the force limit the user has selected in the FFB menu. No forces greater than this will be generated.
- Unlimited: shows what would have been requested, if the force limit wasn't in place.
For example, in most steering wheels, you will typically notice that uncorrected forces are smaller than current forces in low-torque situations, because of the initial FFB deadzone.
A very good steering wheel should have a very linear FFB response, and so the uncorrected and current forces should be almost the same through the entire range of torques.
Source: https://documentation.beamng.com/support/hardware/steering_wheel_setup/#:~:text=Go%20to%20the%20Options%20%3E%20Controls,it%20will%20be%20listed%20there.
0 Response to "How to Set Up Force Feed Backon Beamngdrive"
Post a Comment